Glossy badges in Illustrator
The star tool and opacity masks make it easy to make eye-catching glossy badges for websites and user interface designs. Here's an example of how to do it, including a downloadable Illustrator file to work with.
Here’s what we are going to get to:
If you would like to work through this you can get a copy of the illustrator file here.
Working with light and dark 
Getting a good effect in Illustrator is all about understanding light and where the shadows and highlights fall. If we determine the light source to be to the upper right of the badge we can keep things consistent and create a good effect.
Create the shape 
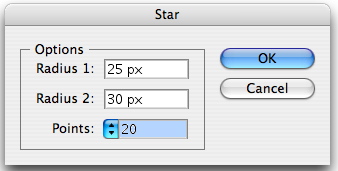
First create the shape using the Star tool. The star tool is tucked away with the Rectangle tool option. Click and hold on the Rectangle tool to see it. Click once on the canvas and you will be able to define what size you want to use. If you want to follow along I have given my star a one 1pt stroke of 8E9407 and a radial gradient.
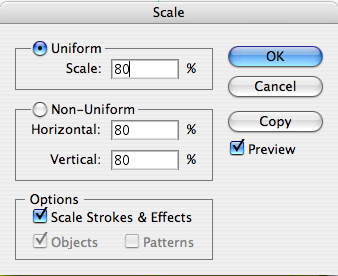
Now lets start to build out the shape. Select the star you have just drawn and copy a new version of it in front of your existing shape. Remove the stroke and fill it with a solid fill of D9E021. Now bring the shape in by going to Object > Transform > Scale. Scale it down to 80%.
Finally round the edges a little by going to Filter > Stylize > Round Corners. I’ve selected 1px. You should end up with something like this. If you like you can give this shape a gradient to help with the shading effect.

Adding the gloss 
Now we need to add the gloss so it is time for the good old Opacity Mask. First create a highlight shape. I like to use a circle and then use the Direct Selection Tool to achieve this. Have a look at the video below for how I create the shape. It helps me to turn Smart Guides on so if you want that go to View > Smart Guides. Once you have the shape label the layer. I’ve called mine “curve” in the download.
Glossy Badges in Illustrator from George Ornbo on Vimeo.
Now copy the inner star that you have drawn and paste it in front of the original (Edit > Paste in Front). Call this layer “highlight”. Now make sure you have the correct layer selected and give your copy have a white fill. No call up the transparency menu and in the fly-out menu in the top right click Make Opacity Mask. Now go back to your layer “curve” and copy this. Return to the opacity mask and paste it in to show the highlight. Add a gradient to complete the effect. This is a little complex so watch the video below if you are struggling. Sorry for the poor video - it is the best I can do at the moment!
Then just add the text. I’ve used Folks which is a great free font.
That’s it - a simple resizable badge in Illustrator. If you haven’t got the illustrator file yet you can grab it here.
Tags
Can you help make this article better? You can edit it here and send me a pull request.
See Also
-
Pattern Brushes in Illustrator Part Two
In part two of looking at Pattern Brushes in Ilustrator we look at how to expand brushes to add shapes to corners and the ends of paths. -
Pattern Brushes in Illustrator Part One
Pattern Brushes in Illustrator are a great way to create complicated designs in no time. Part one shows an example of how to use Pattern Brushes with circles. -
Circular shapes and patterns in Illustrator
Making circular shapes and patterns in Illustrator is straightforward using a simple technique. Here's how to save yourself some time.